

A graphic tee should sit at the shoulder seam, skim the chest without clinging, and land near the top of your fly. That’s the baseline. Which cut you choose — slim, standard, relaxed, or oversized — depends on the look you want and how you plan to wear it.
Before you buy anything, pull up the flat chest measurement and check whether the brand shows a model lineup with heights and weights listed. Those two things tell you more than any letter size ever will.
Three fit issues to avoid at a glance:
- Shoulder seams sliding off the shoulder (too big) or pulling toward the neck (too small)
- Hem riding up and exposing your stomach when you raise your arms
- Chest fabric pulling across the print or bunching at the sides
Pro Tip: Grab a tee you already love, lay it flat, and measure armpit to armpit. That number is your chest width baseline. Compare it directly to the brand’s flat garment measurements before ordering.
Key Takeaways
The single most important rule: check the flat chest measurement and the model lineup before you buy — those two data points predict fit better than any letter size.
| Point | Details |
|---|---|
| Measure before you buy | Take your chest circumference and compare it to the brand’s flat armpit-to-armpit measurement doubled. |
| Fit label beats letter size | Slim, standard, relaxed, and oversized cuts vary widely across brands — the label tells you the silhouette. |
| Graphic placement matters | A front graphic should sit 2–3 inches below the neckline; verify scale across sizes in product photos. |
| Fabric affects long-term fit | Heavyweight cotton holds shape; tri-blends drape closer and may need sizing up for a roomier feel. |
| Imuskop for graphic tees | Imuskop offers original-artwork tees in multiple fits with free shipping and flat measurements on every product page. |
Table of Contents
- How to measure yourself and read size charts correctly
- Fit types explained: which cut works for your body and style
- How a graphic should sit and scale on the tee
- How the tee should actually sit on your body
- How fabric, weight, and construction affect fit over time
- What to do when you’re between sizes
- Outfit recipes: how to style each fit
- What to check on the product page before you buy
- How Imuskop approaches fit and what we recommend to customers
- Where graphic tee styling is actually headed
- Imuskop graphic tees: fit resources and where to shop
- Sources
How to measure yourself and read size charts correctly
Getting your graphic tee sizing right starts with four measurements. Take them in this order:
- Chest: Wrap a soft tape measure around the fullest part of your chest, just under your arms. Keep it level and snug but not tight. This is your body chest circumference.
- Shoulder width: Measure straight across your upper back from shoulder point to shoulder point. This one is easy to underestimate — have someone help if you can.
- Body length: Measure from the top of your shoulder (where a seam would sit) straight down to where you want the hem to land.
- Sleeve length: From the center back of your neck, over the shoulder, and down to your wrist. Most tees only list body length and chest, but sleeve length matters for fitted cuts.
Converting body measurements to garment measurements
Brands list flat garment measurements, not body measurements. To convert: lay a tee flat on a table, smooth it out, and measure armpit to armpit. Double that number to get the chest circumference equivalent. A flat chest width of 20 inches equals a 40-inch chest circumference.
Flat garment measurements and a sizing line-up with model photos showing heights and weights are the most reliable tools for predicting real fit. Fit labels — standard, semi-fitted, slim, relaxed — matter more than the letter size alone, since a “large” in one brand can measure the same as a “medium” in another.
You can also check a retail size guide to see how body measurements map to garment sizes across common U.S. sizing conventions.
Measurement checklist before checkout:
- Body chest circumference (tape measure, fullest point)
- Flat chest width from the brand’s size chart (multiply by 2 to compare)
- Front body length from shoulder to hem
- Shoulder width if the brand lists it
- Sleeve length for slim or fitted cuts
Pro Tip: Use a tee that already fits you perfectly as your measuring baseline. Lay it flat, measure it, and match those numbers to the brand’s chart rather than relying on your usual letter size.
Fit types explained: which cut works for your body and style
Four cuts cover almost every graphic tee on the market. Each one creates a different silhouette, and the right choice depends on your body and the look you’re going for.
Slim fit
The shoulder seam sits exactly at the shoulder point. The torso tapers slightly, sleeves hit mid-bicep or just above, and the hem falls at the hip. It reads clean and intentional. Slim fits work well on lean or athletic builds and look sharp tucked into trousers or paired with slim-cut jeans. If you’re between sizes, go up — a slim tee that’s too tight across the chest looks worse than one with a little room.
Standard fit
This is the most forgiving cut. The shoulder seam sits at the shoulder point, the torso has a straight or very slightly tapered drape, and the hem lands at the hip. Visual cues like the sleeve hitting mid-bicep and the shoulder seam aligning with the shoulder are the practical markers for a well-fitted standard tee. Works on most body types and is the safest pick when you’re unsure.
Relaxed fit
Wider through the chest and torso, with a slightly longer hem. The shoulder seam may sit a half-inch off the shoulder point. Sleeves are roomier and often cut a little longer. Relaxed fits suit casual layering and work across a wide range of body types. Retail garment charts show that box and relaxed fits use wider chest measurements and longer front lengths than regular fits — so if you’re comparing numbers, expect a relaxed large to measure noticeably wider than a standard large.
Oversized fit
Dropped shoulders, a boxy torso, and a hem that falls at or below the hip. The shoulder seam lands well off the shoulder point — sometimes two inches or more. This is a deliberate style choice, not a sizing mistake. Oversized cuts suit streetwear pairings and work best on medium to tall frames. If you’re shorter, a cropped oversized tee keeps the proportions from getting swallowed.
Comparison: four graphic tee fits at a glance
| Fit type | Key measurements to check | Sizing guidance | Best styling use-case |
|---|---|---|---|
| Slim | Chest width, shoulder width | Size up if between sizes | Tucked into trousers, slim jeans, clean casual |
| Standard | Chest width, front length | True to size for most | Everyday wear, layering, mixed groups |
| Relaxed | Chest width (wider), front length (longer) | True to size or size down for a cleaner look | Casual, weekend, light layering |
| Oversized | Shoulder drop, front length | Size up one to two sizes | Streetwear, baggy bottoms, statement looks |
How a graphic should sit and scale on the tee
Placement makes or breaks a print. A graphic that drifts too low looks like an afterthought; one that sits too high disappears under a jacket collar.
The standard rule: a front graphic should sit a few inches below the neckline. That position keeps the print visible when you layer an open shirt or jacket over the tee, and it centers the artwork in the visual “sweet spot” of the chest. Standard full-front print dimensions typically fall in the 10–12 inches wide by 10–14 inches high range.
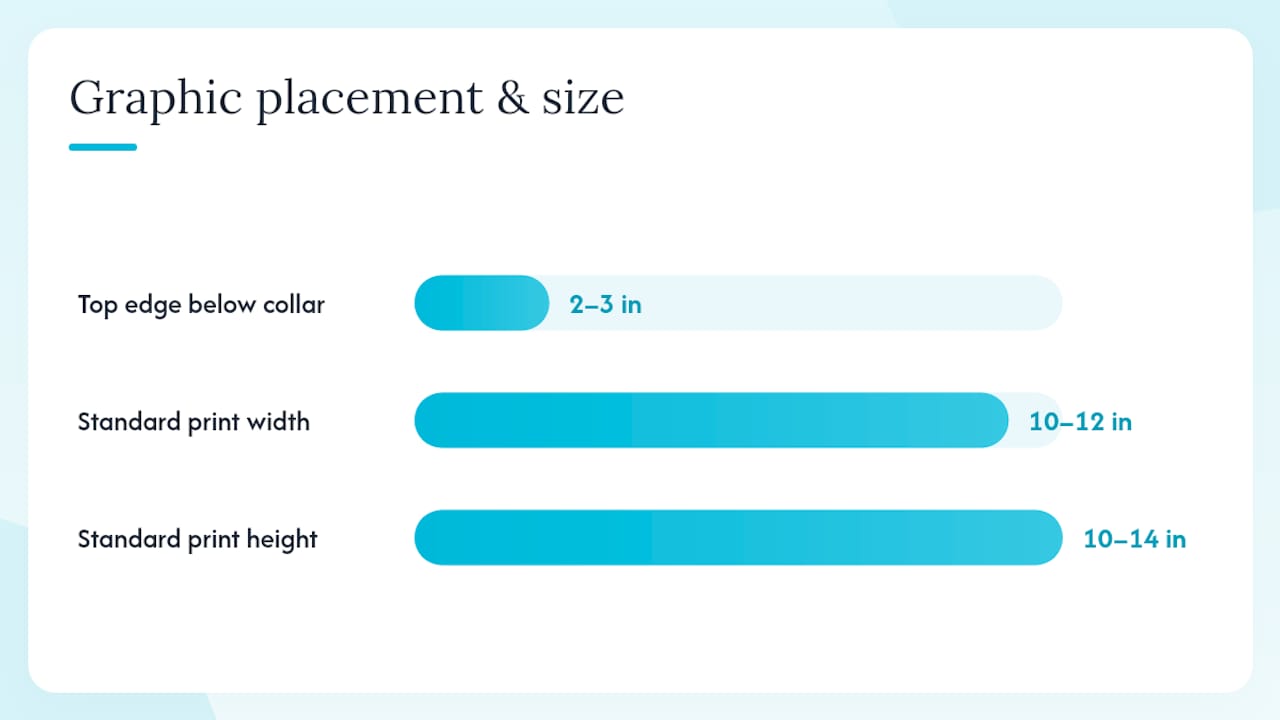
Scale across sizes is a real issue. Many print providers use a single artwork file for all adult sizes, so the exact same graphic will appear proportionally smaller on a 2XL than on a medium. If you’re ordering a larger size and the print looks small in the product photo, that’s why. Check whether the brand scales artwork per size or uses a fixed file — it’s worth asking, and some brands note it in their product descriptions. You can learn more about how different print methods handle this in Imuskop’s breakdown of DTF vs. DTG printing.
Graphic placement checklist:
- Graphic top edge sits 2–3 inches below the collar seam
- Print width proportional to chest width (not wider than the chest panel)
- Check product mockup photos at multiple sizes if available
- Verify whether the brand scales artwork across sizes or uses one fixed file
Pro Tip: When shopping online, zoom into the product photo and look at how much blank fabric sits between the collar and the top of the graphic. If it looks cramped or too low even on the model, it will look worse on you.
How the tee should actually sit on your body
Fit lives in the details. Here’s what to look for when you try one on or evaluate a product photo.
Hem length:
- Classic/standard fit: hem lands at or just below the waistband, roughly at the top of the fly
- Relaxed fit: hem falls slightly below the fly, covering the waistband
- Oversized fit: hem drops to the upper hip or lower, sometimes mid-thigh on very boxy cuts
Sleeve length:
- Slim and standard: sleeve hem hits mid-bicep for a balanced look
- Relaxed: sleeve hem sits slightly lower, closer to the lower bicep
- Oversized: sleeve may drop to the elbow or just above — this is intentional with dropped-shoulder construction
The arm-raise test: Lift both arms straight up. The hem should not expose your stomach. If it does, the tee is too short or too small. On a well-fitted tee, the hem stays at or below the waistband through normal movement.
Good fit cues vs. bad fit cues:
- ✓ Shoulder seam sits at the shoulder point (or intentionally dropped for oversized)
- ✓ Chest fabric lies flat with no horizontal pulling across the print
- ✓ Hem stays put when you move
- ✗ Shoulder seam slides toward the neck (too small) or off the shoulder (too big for standard/slim)
- ✗ Chest fabric pulls across the graphic, distorting the print
- ✗ Hem rides up past the waistband when arms are raised
How fabric, weight, and construction affect fit over time
The fabric your tee is made from changes how it fits on day one and how it fits after twenty washes.
| Fabric | Feel and drape | Shrinkage risk | Best fit choice |
|---|---|---|---|
| Cotton (standard) | Structured, holds shape | Moderate shrinkage in hot water | Standard or relaxed; size up if pre-shrunk label is absent |
| Tri-blend (cotton/poly/rayon) | Soft, drapes close to body | Low | Semi-fitted or slim; size up for a roomier drape |
| Heavyweight cotton | Stiff, structured, minimal drape | Low to moderate | Oversized or relaxed; structure holds the silhouette |
Heavier, structured tees suit oversized silhouettes and streetwear pairings; lightweight tri-blends drape closer to the body and suit semi-fitted looks. Heavier cottons also maintain their shape longer wash after wash, which matters if you’re buying a tee for the long haul.
Pre-shrunk claims: “Pre-shrunk” means the fabric was treated before cutting, but it doesn’t mean zero shrinkage. Flat measurements from the brand are still your best guide — they reflect the garment as sold, before any washing.
Care tips to protect fit:
- Wash in cold water and air dry when possible
- Avoid high-heat dryer cycles, which accelerate shrinkage and break down knit structure
- Turn the tee inside out before washing to protect the print and reduce surface friction
Stretch and recovery: Knit quality determines how a tee bounces back after wear. A tee with a tight, even knit structure will recover its shape; a loose or uneven knit stretches out at the collar and underarms over time. Heavyweight cotton tees tend to hold their structure better than lightweight alternatives, especially around the collar.
What to do when you’re between sizes
This comes up constantly, and the answer depends on the fit label and the look you want.
Three decision rules:
- Size up if you’re between sizes on a slim or semi-fitted tee, or if you want a relaxed drape on a standard cut. Chest comfort matters more than shoulder width in most cases.
- Stay true to size on a standard or relaxed fit when your measurements fall in the middle of the size range. Standard fit is the safest call when you’re unsure.
- Size down only if you’re at the very top of a size range on an oversized cut and you don’t want it to overwhelm your frame.
If you’re between sizes on a semi-fitted or slim tee, size up; standard fit is the safest call for mixed groups or anyone unsure of their size.
Unisex vs. women’s sizing
Unisex tees are cut wider through the shoulders and torso. Women’s or fitted cuts are narrower through the shoulders and tapered at the waist. If you’re buying a unisex tee and prefer a fitted look, size down one. If you’re buying a women’s cut and prefer a relaxed drape, size up one. A simple rule: check the flat shoulder measurement. Women’s cuts typically run 1–2 inches narrower at the shoulder than the equivalent unisex size.
For group orders where bodies vary, sizing guidance for group outing shirts recommends defaulting to standard unisex fit and letting individuals size up or down from there.
Pro Tip: Order one size, try it on, and use the return window before committing to multiples. Most U.S. brands offer at least 30 days. One test order saves you from a stack of wrong-sized tees.
Outfit recipes: how to style each fit
Fit and styling work together. The same graphic tee reads completely differently depending on what you pair it with.
Slim fit: Tuck it into straight-leg or slim chinos for a put-together casual look. Add white sneakers and a watch. For a slightly edgier take, leave it untucked over dark slim jeans with Chelsea boots. The tee does the talking — keep everything else simple.
Standard fit: The most versatile option. Wear it untucked over medium-wash jeans and clean sneakers for everyday wear. Half-tuck the front into high-waisted trousers for a relaxed but intentional look. Layer an open flannel or overshirt on top for cooler days. Check Imuskop’s guide to men’s fashion t-shirt trends for current silhouette ideas.
Relaxed fit: Pair with wide-leg or straight-leg jeans and chunky sneakers. Leave it fully untucked. A relaxed tee layered under an open bomber or coach jacket hits the right casual-streetwear balance. Avoid slim trousers — the proportions fight each other.
Oversized fit: Boxy, oversized tees work with baggy cargos and wide-leg jeans; the silhouette needs volume below to match the volume above. Pair with low-profile sneakers or boots. Avoid tucking — it defeats the purpose of the cut. For sneaker-focused outfits, Imuskop’s sneaker-inspired graphic tees are built for exactly this pairing.
GQ’s current editorial coverage shows two dominant directions: maximalist oversized graphics with sporty bottoms, and pared-back outfits where a single playful tee carries the whole look. Both work — pick the one that matches how you actually dress.
Layering and tuck rules by fit:
- Slim: full tuck or half-tuck works; untucked is clean if the hem length is right
- Standard: half-tuck or untucked; full tuck only with high-waisted bottoms
- Relaxed: untucked always; layering under open outerwear works well
- Oversized: untucked only; layer over, never under
What to check on the product page before you buy
A two-minute product page audit prevents most fit surprises.
Pre-purchase checklist:
- Flat chest measurement: listed in the size chart, not just a letter size. Compare armpit-to-armpit to your own flat measurement.
- Front length: check it matches where you want the hem to land for your chosen fit.
- Model lineup: look for photos of real people wearing each size, with heights and weights listed. Find the model closest to your build.
- Fit label: standard, slim, relaxed, oversized. This tells you the intended silhouette before you look at any number.
- Fabric weight: listed in oz/yd² or grams. Heavier means more structure; lighter means more drape.
- Care and shrinkage notes: “pre-shrunk” is good; no mention means assume some shrinkage.
- Return policy: confirm you can exchange or return before ordering a new brand for the first time.
Flat measurements beat letter sizes every time. A brand’s “large” is meaningless without the chest width number behind it. Retail garment charts show exactly how chest circumference and front length vary by size — use them.
On graphic placement: check the product photo carefully. If the print looks small or off-center on the model, it will look the same on you. Some brands note whether artwork is scaled per size; if they don’t say, assume it isn’t.
How Imuskop approaches fit and what we recommend to customers
Imuskop builds its graphic tees around original artwork, which means fit and print placement get equal attention. A great graphic on a poorly fitting tee is a missed opportunity — the print should sit flat, centered, and proportional to the chest panel.
What Imuskop recommends when you’re choosing a fit:
- Start with the flat chest measurement from the size chart, not the letter size
- Check the model photos and note the model’s height and weight if listed
- Match the fit label (standard, relaxed, oversized) to the look you want before worrying about the size letter
- For streetwear-leaning styles, lean toward relaxed or oversized; for cleaner, more versatile looks, standard is the reliable call
Imuskop’s tees are made with quality materials chosen to hold their shape and keep the graphic looking sharp wash after wash. The men’s fashion t-shirt guide on Imuskop walks through how to combine different tee silhouettes with the rest of your wardrobe.
Pro Tip: If you’re unsure between two sizes, go with the flat chest measurement over the letter size every time. Brands size differently — the number doesn’t lie.
Have a sizing question? Reach out through the Imuskop site directly — the team can point you to the right fit based on your measurements and the style you’re after.
Where graphic tee styling is actually headed
The split GQ is documenting right now — maximalist oversized versus stripped-back classic — isn’t really a trend divide. It’s a fit divide. The people going oversized are making a deliberate statement about silhouette; the people going classic are letting the graphic carry the weight. Both approaches require the same underlying discipline: knowing your measurements, reading the size chart, and choosing the cut that serves the look you actually want.
What gets lost in most styling advice is that fit communicates intent. A slim tee tucked into trousers says something different from the same graphic on a boxy, dropped-shoulder cut. Neither is wrong. But wearing the wrong fit for the look you’re going for — a too-tight tee you meant to wear casually, or an oversized cut that swamps a frame that needed a standard — that’s where style falls apart. The practical rules in this guide aren’t restrictions. They’re the framework that makes the creative choices land.
Imuskop graphic tees: fit resources and where to shop
Imuskop’s graphic tees are designed for people who care about both the art and the fit. The collection spans standard, relaxed, and oversized cuts — all with original artwork across pop culture, activism, and streetwear themes.
Every order ships free, and interest-free payment plans through Affirm mean you can pick up multiple fits without the upfront hit. If you want to compare silhouettes or need help matching a measurement to the right size, the full collection and sizing details are at Imuskop. Browse by fit, check the flat measurements on each product page, and use the model photos to find your closest match. If you’re still unsure, reach out — the team is there to help you get it right the first time.
Sources
- T-Shirt Design Size Guide
- Our complete custom t-shirt sizing guide: For everyone & every t-shirt style - Custom Ink Blog
- The Graphic Tees GQ Editors Are Buying This Summer 2026 | GQ
- How to wear graphic t-shirt trend | FashionBeans